
How do I configure ILLiad and Alma integration?
Answer
Table of Contents
- About ILLiad and Alma Integration
- Creating an ILLiad Resource Sharing Partner in Alma
- Exporting Unfilled Alma Resource Sharing Borrowing Requests to ILLiad
- Creating Temporary Item Records for ILLiad Borrowing Requests in Alma
- Automatically Moving ILLiad Lending Items to Alma's Temporary Lending Location
About ILLiad and Alma Integration
ILLiad and Alma can be integrated in the following manners.
Borrowing:
- Unfilled Alma resource sharing requests can be automatically exported to ILLiad. This works for both loan and article requests.
- Temporary item records can be created in Alma for items received from other libraries in ILLiad, which allows you to circulate ILLiad items in Alma and your users to see and renew their ILLiad items in Primo
- Renewal due dates can be automatically transmitted from ILLiad to Alma
Lending:
- Items being loan to other libraries via ILLiad can automatically be moved to Alma's temporary lending location, which eliminates the need for staff to manually check those items out in Alma
Important Notes:
- Integrating ILLiad and Alma is optional.
- You can choose to implement only certain aspects of ILLiad and Alma integration.
- All forms of ILLiad and Alma integration require the creation of an ILLiad resource sharing partner in Alma. You do not need to create separate ILLiad resource sharing partners for borrowing and lending integration. A single ILLiad resource sharing partner will be sufficient.
- In order for borrowing integration to work, your ILLiad usernames must match one of your Alma identifiers.
- In order for lending integration to work, the barcode of the item being lent must be in the ILLiad request record. Manually copying barcodes from Alma to ILLiad is very time consuming, so this integration is recommended only for libraries that are using IDS Logic to automatically add barcodes to their ILLiad requests.
Creating an ILLiad Resource Sharing Partner in Alma
All forms of ILLiad and Alma integration require the creation of an ILLiad resource sharing partner in Alma. In order to create a resource sharing partner, you need the Resource Sharing Partners Manager role. To create a resource sharing partner for ILLiad, you need to do the following:
1. From the main Alma page, go to Fulfillment | Resource Sharing | Partners and then click the Add Partner button.


2. Select the General Information tab and enter the following values.
| Field | Value |
| Code | ILL |
| Profile Type | NCIP |
| System Type | ILLiad |
| Name | ILLiad Requests |
| Status | Active |
| Supports Borrowing | Checked |
| Supports Lending | Checked |
| Borrowing Workflow | ILLiadBorrowing |
| Lending Workflow | ILLiadLending |
3. Select the Parameters tab and enter the following values.
| Field | Value |
| General Information - User Identifier Type |
Select the Alma identifier that matches your ILLiad usernames (Note: if you do not wish to configure any borrowing integration you can leave this setting at primary Identifier) |
| General Information - Request Pushing Method | Link |
| General Information - Default library owner | library you've designated as your Resource Sharing Library |
| Request Item - Bibliographic record ID type | OCLC Number |
| Check-Out Item - Default location | Lending |
| Check-Out Item - Default item policy | RS Long Loan |
| Accept Item - Default location | Borrowing |
| Accept Item - Automatic receive | Checked |
| Accept Item - Default pickup library | library you've designated as your Resource Sharing Library |
| Accept Item - Receive Desk | Default Circulation Desk |
| Export to Third Party - Export to third party |
If you wish to configure Alma to export unfilled requests to ILLiad, please see this section of this FAQ. If not, set this value to No. |

Exporting Unfilled Alma Resource Sharing Borrowing Requests to ILLiad
To configure Alma to export unfilled resource sharing requests to ILLiad, you will need to configure a rota template, a rota assignment rule, and a sending borrowing request rule. To do this work, you will need the Fulfillment Administrator role. You will also need to edit the ILLiad resource sharing partner you created. To do that, you will need the Resource Sharing Partners Manager role. Lastly, you may want to configure an ILLiad routing rule to move requests imported from Alma to their own queue.
Note: As for the July 2021 Alma release, Alma can be configured to auto-create ILLiad user records if the requester doesn't already have an ILLiad account.
1. Navigate to Fulfillment | Resource Sharing | Rota Templates and click the Add Template button.
2. Select the General Information tab and enter the following values.
| Field | Value |
| Code | ILLiad |
| Name | ILLiad |
| Type | Non Ordered |
| Status | Active |
Example:

3. Select the Template Members tab, click the Add Partners link, and then click the Select from a list link.
4. Check the box next to the ILLiad Requests partner and then click the Select button.
Example:

5. Click the Save button.
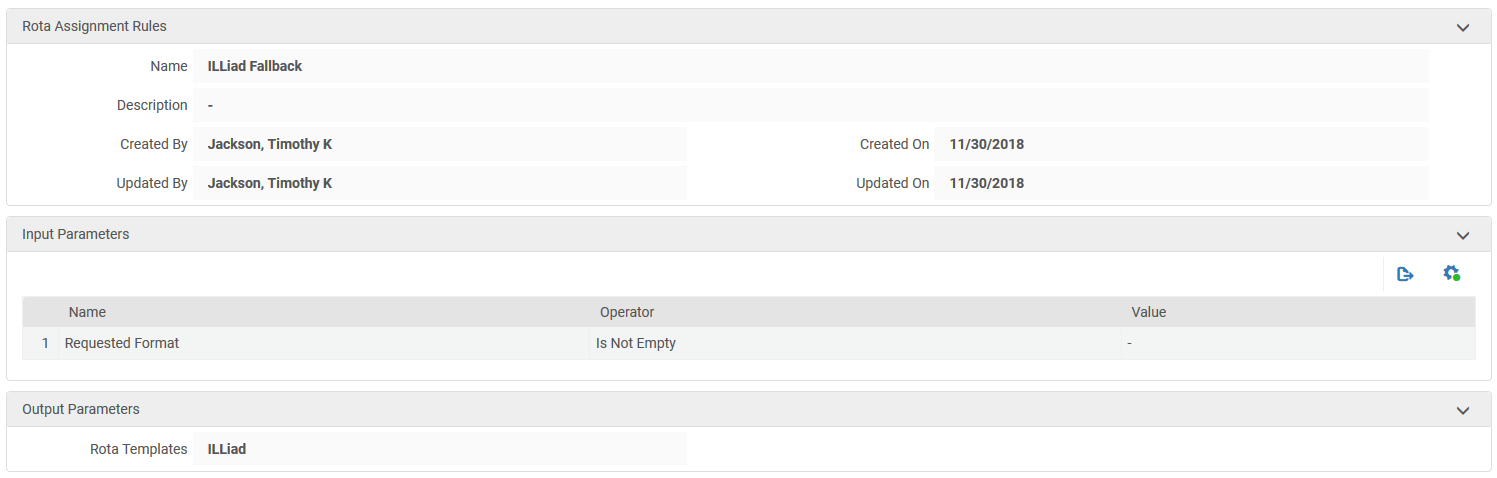
Configuring a Rota Assignment Rule
1. Navigate to Configuration Menu | Fulfillment | Resource Sharing | Rota Assignment and click the Add Rule button under Institution Rules List.
2. Under Rota Assignment Rules, enter ILLiad Fallback in the Name field.
3. Under Input Parameters, click the Add Parameter button, select the values listed below, and then click the Add Parameter button.
| Field | Value |
| Name | Requested Format |
| Operator | Is not empty |
4. Under Output Parameters, click the Select from a list link in the Rota Templates field, check the box next to the ILLiad rota, and click the Select button.
Example:
5. Click the Save button.
Configuring a Sending Borrowing Request Rule
1. Navigate to Configuration Menu | Fulfillment | Resource Sharing | Sending Borrowing Request Rules and click the Add Rule button under Institution Rules List.
2. Under Input Parameters, click the Add Parameter button, select the values listed below, and then click the Add Parameter button.
| Field | Value |
| Name | Partner |
| Operator | = |
| Value | ILLiad Requests |
3. Under Output Parameters, select True in the Send Request field, and then click the Save button.
Example:

Configuring the ILLiad Resource Sharing Partner
Before configuring your ILLiad resource sharing partner, you'll need to configure a new API Key in ILLiad. Please see the following Atlas Systems documentation on how to configure a new API Key:
https://support.atlas-sys.com/hc/en-us/articles/360011809334
Note: The new API Key will not work until you restart the IIS and Odyssey Manager services on the ILLiad server.
1. Go to Fulfillment | Resource Sharing | Partners
2. Click the ellipsis next to your ILLiad resource sharing partner and then click the Edit link.

3. Click the Parameters tab.

4. Enter the following information into Export to Third Party section of the Parameters tab and then click Save. Do not check the Close Request When Exported box. This will prevent you from updating the original Alma request once the requested item is received in ILLiad.
- Export to third party: Using API
- URL: BaseWebserviceurl from your ILLiad WebPlatformConfig table followed by "/transaction"
- Export request ID name tag: CitedIn (Note: This will put the External ID of the Alma request in ILLiad's CitedIn field. You can have the API put the External ID in a different ILLiad field if you wish.)
- API key: APIKey from your ILLiad WebPlatformConfig table (Note: The API Key shown below is not a valid API Key and should not be used.)

Configuring Alma to Auto-Create ILLiad User Records
As for the July 2021 Alma release, Alma can be configured to auto-create ILLiad user records if the requester doesn't have an ILLiad account. This feature is not recommended for libraries that use ILLiad authentication. Alma can create ILLiad accounts that use ILLiad authentication, but it will not create passwords for those accounts. Users will not be able to log in to ILLiad with those accounts unless you manually create a password and send it to them.
Note: You must use the same NVTGC and Status for all ILLiad accounts created by Alma. If you need to manually adjust those values after the accounts have been created, we suggest you use a default Status like "Created via Alma" so you can easily identify these accounts in the ILLiad client.
1. Go to your ILLiad resource sharing partner, click on the Parameters tab, scroll down to the Export to Third Party section, and check the Create User in ILLiad box. New configuration settings will appear.

2. Enter the following values into the configuration settings that appear when you check the Create User in ILLiad box and then click the Save button.
| Field | Value |
| Search User in ILLiad Using | The Alma identifier that matches your ILLiad usernames |
| NVTGC | The default NVTGC value for ILLiad accounts created by Alma |
| Status | The default user status for ILLiad accounts created by Alma |
| Notification Preferences | leave blank |
| Notification Method | Electronic |
| Delivery Method | Hold for Pickup |
| Loan Delivery Method | Hold for Pickup |
| Electronic Delivery | Yes |
| Auth Type | Default |
Example:

Configure an ILLiad routing rule to move requests imported from Alma to their own queue
When a request is created in ILLiad, it will be placed in the Awaiting Request Processing queue. If you would like to have ILLiad move these requests to a different queue, you can use a routing rule like the one below.

Please note:
- The above rule assumes that Alma has been configured to put the Alma request's External ID in the CitedIn field in ILLiad (see the Export request ID name tag setting in the ILLiad resource sharing partner in Alma). If you configured Alma to put the External ID in a different ILLiad field, you will need to adjust the routing rule's MatchString accordingly.
- This routing rule should be positioned before any other routing rules acting on the Awaiting Request Processing queue.
For more information on configuring custom routing rules, please see:
https://support.atlas-sys.com/hc/en-us/articles/360011908893-Configuring-Routing-Rules
For additional information on options for processing requests exported from Alma in ILLiad, please see:
https://sunyolis.libanswers.com/faq/266483
Creating Temporary Item Records for ILLiad Borrowing Requests in Alma
Creating temporary item records for ILLiad borrowing requests in Alma will allow your staff to circulate ILLiad items in Alma, and it will also allow your users to view and renew their ILLiad requests from their Primo accounts. These temporary records will be created when you click the Check In button while receiving the item in ILLiad. To create temporary item records for ILLiad borrowing requests in Alma, you need to create an item policy, a temporary item creation rule, and a fulfillment unit rule in Alma. To do that work, you will need the Fulfillment Administrator role in Alma. You will also need to install the borrowing NCIP client addon. If you would like Alma due dates to be automatically updated when a request is renewed in ILLiad, you can also install the borrowing renewal server addon in ILLiad.
1. Go to Configuration, select your resource sharing library from the dropdown in the upper left corner, click the Fulfillment tab on the left, and then click the Item Policy link.

2. Click the Add Row button, enter RS_ILLiad_Loan in the Code field, enter RS ILLiad Loan in th Description field, select No from the Default Value dropdown, and click the Add Row button.

3. Click the Save button.
Creating a Temporary Item Creation Rule
1. Go to Configuration, select your resource sharing library from the dropdown in the upper left corner, click the Fulfillment tab on the left, and then click the Temporary Item Creation Rule link.

2. Click the Add Rule button.

3. Enter ILLiad RS Loan into the name and description fields.

4. Under Input Parameters, click the Add Parameter button, select Resource Sharing Partner from the Name dropdown, select the equals sign from the Operator dropdown, select your ILLiad resource sharing partner from the Value dropdown, and then click the Add Parameter button.

5. Under Output Parameters, select Main-Borrowing from the Location dropdown and RS Long Loan from the Item Policy dropdown.

6. Click the Save button.
7. Use the Move Up button to move the ILLiad RS Loan rule you created to the top of the temporary item creation rules list.

Creating a Fulfillment Unit Rule
1. Go to Configuration, select your resource sharing library from the dropdown in the upper left corner, click the Fulfillment tab on the left, and then click the Fulfillment Units link.

2. Click the ellipsis next to your resource sharing fulfillment unit and the click Edit.

3. Click the Fulfillment Unit Rules tab, make sure the Rule Type dropdown is set to Loan, and then click the Add Rule button.

4. Under Fulfillment Unit Rules Editor, enter RS ILLiad Loan into the Name and Description fields.

5. Under Input Parameters, click Add Parameter, select Item Policy from the Name dropdown, select the equals sign from the Operator dropdown, select RS ILLiad Loan from the Value dropdown, and then click Add Parameter.

6. Under Output Parameters, select RS Long Loan from the Terms of Use dropdown.

7. Click the Save button.
8. Use the Move Up button to move the RS ILLiad Loan rule to the top of the list of fulfillment unit loan rules.

Installing the ILLiad Borrowing NCIP Client Addon
1. Download the addon .zip file.
Note: There is a line of code in the LUA file that checks to make sure the external identifier being passed from ILLiad to Alma is valid. This addon was created for use by SUNY libraries, so it defines a valid external identifier as anything beginning with "01SUNY". If you are at a non-SUNY library, you will need to change that code from "01SUNY" to your library's external identifier prefix.
2. Open the ILLiad_Alma_NCIP_Borrowing_V3.zip file and copy the addon folder to the C:\Program Files (x86)\ILLiad\Addons directory. Detailed instructions on installing ILLiad client addons can be found here:
https://atlas-sys.atlassian.net/wiki/spaces/ILLiadAddons/pages/3149384/Installing+Addons
Please note that this client addon will need to be installed at each workstation individually unless you redirect ILLiad's default addon directory. More information on how to do that can be found here:
https://atlas-sys.atlassian.net/wiki/spaces/ILLiadAddons/pages/3149399/Addon+Locations
3. If you have multiple pickup locations in ILLiad, configure the sublibraries.txt file in the addon folder. Open the file and edit it to so the NVTGCs and Alma library codes match the NVTGCs and Alma library codes used at your library. Entries should list the NVTGC and then the Alma library code separated by a comma.
Examples: NVTGC of LAW and Alma Library code of BUFLA → LAW,BUFLA
NVTGC of ILL and Alma library code of ALBC → ILL,ALBC
If you have ILLiad pickup locations for home and/or office delivery, the Alma library codes you will need to enter into the sublibraries.txt file are HOME_DELIVERY and OFFICE_DELIVERY.
4. Open the ILLiad Client, click the Systems tab, and click the Manage Addons button.
5. Select the ALMA_NCIP_Borrowing_Client_V3 addon and enter the following information into the settings fields. Fields not listed below can be left at their default settings.
- NCIP_Responder_URL: Your Alma server address followed by /view/NCIPServlet
- acceptItem_from_uniqueAgency_value: Your institutional Alma code
- ApplicationprofileType: ILL
- ILLiad_field_to_get_external_identifier: This setting determines which ILLiad field is used as the External Identifier in Alma. You should use the same field that you entered into the Export Request ID Name Tag field when configuring your ILLiad resource sharing partner in Alma. This will allow the addon to update the original Alma request rather than create a brand new Alma request.
- ILLiad_field_to_get_barcode: This setting determines which ILLiad field is used as the item barcode in Alma. If you would prefer to use the barcode from the book you borrowed, you can change that setting to any ILLiad field you're not currently using and then scan the book's barcode into that field before you click the Check In button in ILLiad. If you do not wish to do this, you can leave the setting at TransactionNumber.
- EnablePatronBorrowingReturns: make sure this box is checked

6. Change the Active value to Yes, click the Save Settings, and then restart the ILLiad client. The addon will not start running until the ILLiad client is restarted.
Important Notes:
- Alma will send hold notifications to users for ILLiad items. To avoid sending your users duplicate hold notifications, you may want to stop sending hold notifications from ILLiad. For information on how to do that, please see this FAQ. If you would rather turn off Alma hold notifications for ILLiad requests, please see this FAQ.
- You will need to figure out how you would like to handle borrowing requests in ILLiad once temporary item records have been created in Alma. For information on several options, please see this FAQ.
Installing the ILLiad NCIP Borrowing Renewal Server Addon
1. Download the Alma NCIP Borrowing Renewal addon .zip file and save it to your desktop.
2. Log in to the ILLiad Customization Manager and click the Server Addons tab
3. Click the New button, navigate to your desktop in the "Chose file to upload" window that appears, select the addon .zip file you downloaded, and click the Open button. Detailed instructions on installing server addons can be found here:
4. Highlight the Alma NCIP Borrowing Renewal addon, enter the configuration values listed below, set the Active field to Yes, and click the Save button.
- FieldToUseForBarcode: TransactionNumber
- NCIP_Responder_URL: Substitute "XXX" for your library's Alma institution code (i.e. the three letter code after "suny-" in your Alma login URL)
- renewItem_from_uniqueAgency_value: Substitute "XXX" for your library's Alma institution code
- ApplicationProfileType: ILL
- RenewItemSearchQueue: Awaiting Renewal OK Processing
- RenewItemSuccessQueue: The queue where borrowing loan requests are routed after they're transferred to Alma via the NCIP addon
- RenewItemFailQueue: NCIP Error: Renew Item Failed

Automatically Moving ILLiad Lending Items to Alma's Temporary Lending Location
Automatically moving ILLiad lending items to Alma's temporary lending location will save you the trouble of having to manually check ILLiad lending items out in Alma. To automatically move ILLiad lending items to Alma's temporary lending location, you need to do the following in ILLiad (other than creating an ILLiad resource sharing partner, no configuration work is needed in Alma):
1. Download the addon .zip file.
2. Open the Alma_NCIP_Lending_only.zip file and copy the addon folder to the C:\Program Files (x86)\ILLiad\Addons directory. Detailed instructions on installing ILLiad client addons can be found here:
https://atlas-sys.atlassian.net/wiki/spaces/ILLiadAddons/pages/3149384/Installing+Addons
Please note that this client addon will need to be installed at each workstation individually unless you redirect ILLiad's default addon directory. More information on how to do that can be found here:
https://atlas-sys.atlassian.net/wiki/spaces/ILLiadAddons/pages/3149399/Addon+Locations
3. Check to see which ILLiad field contains your item barcodes. You will need to be using an ItemInfo field to accommodate multi-volume lending. The addon by default looks for barcodes in ItemInfo3. If you are using a different ItemInfo field, you can change the ILLiad_field_to_get_barcode setting.
4. Open the ILLiad Client, click the Systems tab, and click the Manage Addons button.
5. Select the ALMA_NCIP_Lending_Client addon and enter the following information into the settings fields. Fields not listed below can be left at their default settings.
- NCIP_Responder_URL: Your Alma server address followed by /view/NCIPServlet
- acceptItem_from_uniqueAgency_value: Your institutional Alma code
- ApplicationprofileType: ILL

6. Change the Active value to Yes, click the Save Settings, and then restart the ILLiad client. The addon will not start running until the ILLiad client is restarted.
Note: Unfortunately, there is currently no way to automatically transmit lending renewal due dates from ILLiad to Alma. That will need to be done manually. For more information, please see this FAQ.
Links & Files
Topics
Comments (3)
-
Tim -- thank you for posting this publicly. I know it's for the SLCNY libraries, but I'm trying to implement for my own library at the Univ. of Hawaii at Manoa. Very, very informative; clear and easy to use.
-
Thank for this information. It is very helpful!
-
Hey, SUNY! Very helpful. Any chance someone has experience setting this up for a shared ILLiad server?